I used an LLM to generate the code for this plugin.
I am trying to get better at writing. One of the recommendations I’ve read is
that varying the sentence length makes reading more enjoyable. Naturally, I
wanted to visualise this while writing. Coloring each sentence according to its
length, would make it possible to detect long blocks of same-length sentences;
they would be large uniformly colored blobs. Optionally also show the lengths
in a sidebar column.
Since I use NeoVim for all of my writing, a Lua plugin would do just fine. So I
made one.
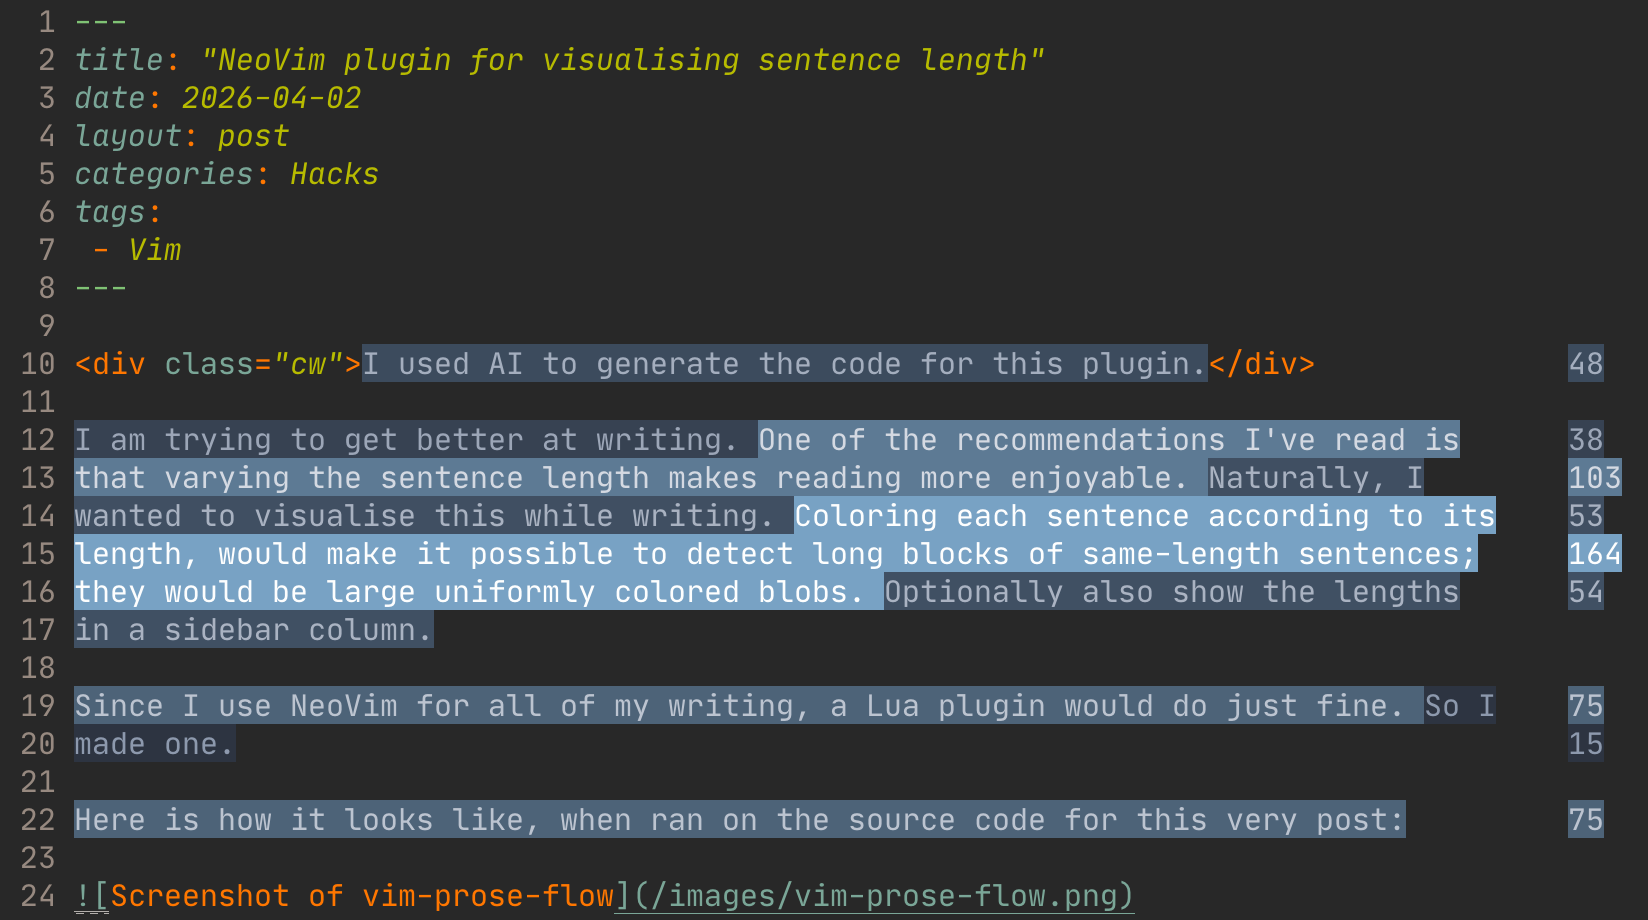
Here is how it looks like, when ran on the source code for this very post:
Although I use Source Hut for all of my code, for Lazy plugins it is
much easier to default to GitHub. You can also find the plugin at
sr.ht. ↩︎
One possible future for programs will be a solid core, with a plugin
architecture that can hook almost anywhere (think WordPress or the old XUL
based Firefox) and is capable of protecting the program well enough.
On top of that people can vibe-code their plugins. The conversations that built
them would be stored, with compacted contexts and plans. On core update or new
extension addition everything will be regenerated.
Sharing would be done only through extraction of specs. No code would be able
to be shared because unless all of the plugins are generated at the same time,
there is no guarantee that the code would work.1
Everything would become slightly less stable, but the base programs could
become simpler. A cottage industry of maintainers and customizers would emerge.
I want to keep a journal, I have three requirements:
The data must be stored as plain text and plain images on disk, that I own.
The entries must be labelled with their creation timestamp, location, and
ideally weather information.
I want to be able to create a journal entry from an image. The above
metadata should be loaded from the image.
I started journaling with Day One1. After it got sold I have lost faith
in its future. They also use a proprietary database with limited export options
which fails my condition 1.
Apple’s Journal looked interesting, but it does not satisfy my conditions 1
and 3.
I looked into self-hosted options:
Journiv2 — has a terrible frontend, uses a database instead of
markdown, has asinine features like “reflect now” that can not be turned off.
Obsidian — would be great but does not support 3 and requires their paid
sync service on iOS.
Diar - iOS shortcuts for authoring journal entries
When I squinted at my requirements I realized that what I need is a Hugo3
blog with a login and different syntax + some goodies, and a couple of iOS
shortcuts.
I always start programming by defining my data structures. First, I’ve decided on the syntax of my entries:
Since the only mandatory metadata is the timestamp, the obvious format is a
markdown file with the timestamp as filename and the entry in the text.
For the other metadata I wanted something human readable and editable. I didn’t want to use a preamble like Hugo does.
My solution is to add a footer using the --- markdown syntax for a horizontal
rule. Then use hashtags for tags, lines starting with /images/ for images,
location prefixed by @ and a simply parsed weather. If there is a line that
matches neither, it is interpreted as plain text location.
E.g.: in a file named 2006-01-02T150405.md:
This is an entry inside my journal, as you can observe it just starts as a plain text.

You can use markdown. I only really use emphasis and blockquotes.

---
/images/a-nice-illustration.jpg
#rhea #journaling
Home, France
@48.8687162,2.2219584
17°C, Cloudy
All of the footer entries are optional.
It was easy to create two shortcuts in iOS to:
Grab the current location, weather and address and write a new note with
current timestamp as filename with this information. Then open the file
immediately with iA Writer.
Receive an image, use it’s exif to get the time and location. If the date is
today, grab the weather. Copy the image into the desired location, create
the note and open it in iA Writer.
The advantage of handling images this way is that iA Writer supports
displaying them in preview mode.
For the first use case the shortcut looks like this:
Rhea - Go server to render the journal in a nice way
Since I knew Hugo was almost what I wanted, I decided to learn Go and write my
server.
My design goes roughly this way:
Fully server-rendered html page.
No static rendering, live-running server only.
Single user, the login credentials are passed through environment.
The program should do the following.
On startup look into the directory that contains the entries.
Iterate over the entries.
If the entry contains an image, generate a thumbnail for it if it hasn’t
been done and store it in a cache directory.
If the entry contains a location, use MapBox to fetch the map, and store
it.
Start watching the entries directory and update the in-memory representation
if anything is added or changed.
Start a web server that serves:
/ - At root show list of the first page of entries, show the location
map if the location changed from previous entry by more than 50km. Show
images as thumbnails.
/after/TIMESTAMP and /before/TIMESTAMP to serve a next/previous page.
/memories/TIMESTAMP - Show a detailed entry with full size images and a
more detailed location map.
/images, /thumbails, /tiles-ZOOM, static - Just serve the files.
/login - Render this page if there is no valid session cookie set.
And that’s about it. Cook this with some nice templates and a bit of CSS and we
have a journaling app.
If you would like the source code feel free to ask, I am no longer publishing
my repositories publicly.
I started lifting 10 years ago using the Starting Strength 5x5 iOS app1. I
would still recommend it for beginners.
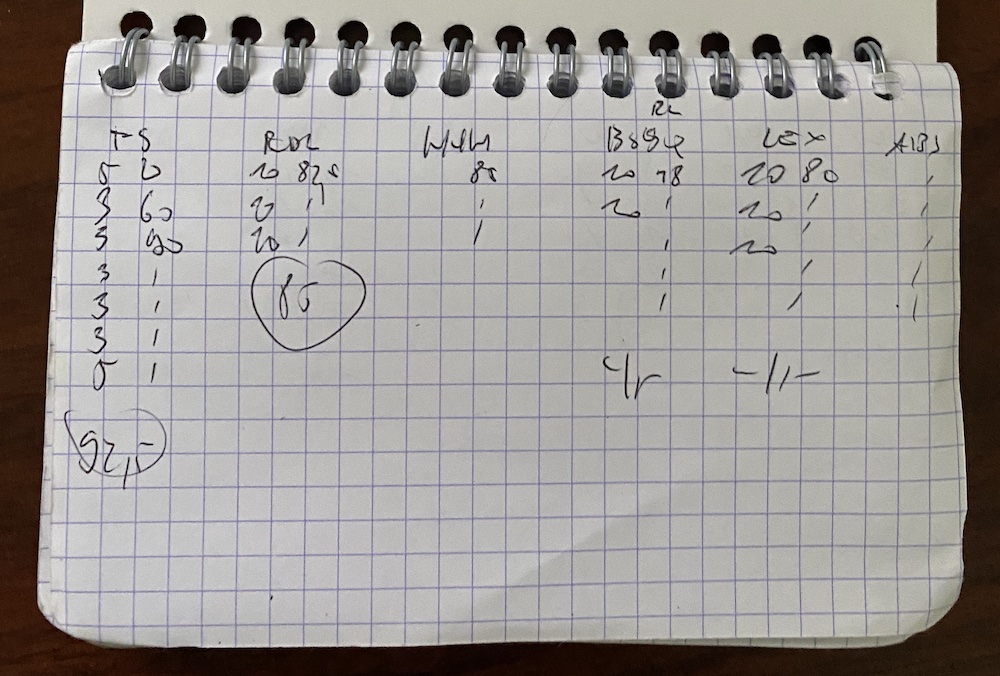
Then when I switched programs to 6 day Push/Pull/Legs 2, I switched to a
paper notepad with just handwritten weights and reps like so:
Since my progression solely depended on the last time and the goal was to do
“moar”, with a 6 day split it was easy, just flip 3 pages before and compare.
Eventually I started using multiple gyms, and didn’t have the notebook with me,
so I switched to a long note in the Notes.app on iOS. There the comparison to
previous time was more tedious, one had to scroll up and down.
Naturally I made an app. I started by making it an iOS app, but quickly
abandoned that since I realized nobody will ever use it and I do not want to go
through the review process.
Note that I made this app for me. I am sharing it with the world since it is
based on many open source contributions. I am licensing it under AGPLv3, but I
provide no support, or would answer for any feature requests.
I have used the Stronglifts
app back around 2016, so I can’t say how it has evolved. ↩︎
I really like the 6 day split, even though these days I usually do it
over 2 weeks rather than a single one.
LinkArchive↩︎